Instances
Instances
When developing shaders, you will often find yourself managing appearances very similar to one another. You might, for example, have two shaders that are identical but for a few differences such as their color, or perhaps the texture map used.
Instances allow you to create these variations, explicitly setting the differences while keeping the rest in sync. Below is an appearance created using the Wavelet Noise template and an instance of that appearance:
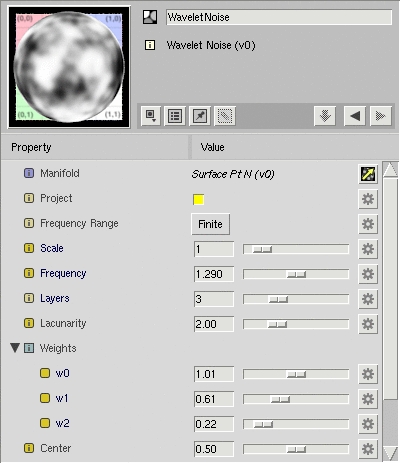
Original |
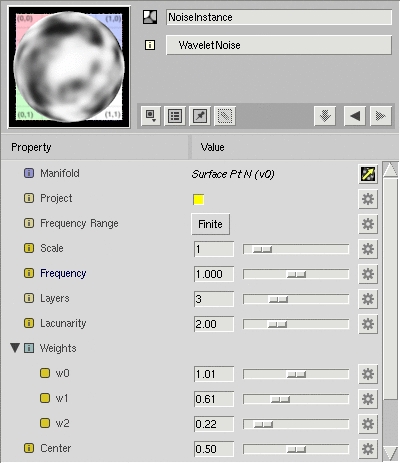
Instance |
Some things to notice about the instance:
- Unless overridden, all parameter values, even when provided by a connection, will match those of the original. The original's parameters are overriden any time you initiate a change in a parameter's value - "undo"-ing the Set Value will "undo" the override as well. In the screenshot above, only the Frequency parameter has an explicit value. The other values are inherited from the original.
- Overriden parameters' labels are drawn in bold in the Property View so you can easily identify local changes. The property menu's "Revert Value" will remove any local override and the value will again be inherited.
- The Preview Swatch lists the original appearance. Clicking this button will take you to the original (unless the original is in a Library Palette).
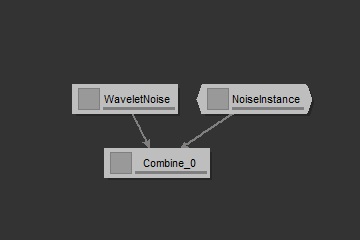
To differentiate themselves in the Network View, instances display with angled edges. Below is a small network incorporating both the instance (NoiseInstance) and the original node (WaveletNoise).
Creating an Instance
To create an instance of an appearance, select the appearance and either choose
Appearance -> Create Node Instance
or, as a convenience, Slim will create instances of the selected node and every upstream node if you choose
Appearance -> Create Network Instance
You can create an instance of any appearance in Slim, even another instance. Such an instance will inherit its values from the original instance, which will inherit its values from the original appearance, which will inherit its values from a template. Instances establish a chain of inheritance, and you can make changes anywhere in that chain.
Instances and Multiple Palettes
It is possible to take an instance and drag it into a new palette. Be aware, however,that the instance relies on the original for its values. If at any time the instance is loaded and the original is not, you will receive a warning in the Message Log, and the instance will be non-functional.
You can also create an instance in a different palette than the original by selecting the destination palette first. The bullseye icon is displayed on the destination palette to confirm that is going to be where the result will go. Then navigate to the original node you want to instance using the Layout menu in the Graph View (by navigating this way you eliminate the risk of changing the destination palette). Create the instance in the usual way and it will be assigned to the destination.
Instances and Library Palettes
Another way to make instances is to put a Library Palette into Instance Mode. When you create new Appearances from a Library Palette in this mode they will be Instances rather than copies. Any changes to the Library Palette will automatically be propagated to the Instances. Since originals in a Library Palette are displayed in the Appearance Browser your shared shaders can be accessed quickly and conveniently.
Used carefully, Library or multiple palettes with instancing can be a powerful tool for reusing your work.
Shader Instances
The instances discussed above are of a single appearance. Shader Instances are instances of the entire network that forms a single shader. They are created by importing the compiled shader.slo file from disk.
A shader instance displays all parameters in the original network that have been marked External. These are the parameters to the shader than can appear in the Surface call in a RIB file. Like a regular instance, the values of these parameters will be updated as they are updated in the original (though, unlike a regular instance, these updates will only occur when the shader is generated).
You can create a Shader Instance by selecting a shader-creating appearance and choosing
Appearance -> Create Shader Instance
This will generate the shader for the selected appearance and import it into your palette. Like a regular instance, a shader instance will show a button with the original appearance in the Appearance View. Use this to navigate to and make changes to the original network.