Preferences
Preferences
The preferences window for Slim can be opened from the Windows menu. Preferences allow the user to control many different aspects of Slim, from tweaking render previewing to unlocking advanced features for expert users.
Interface
- Gain, Gamma: Gain and gamma settings for colors renders and textures.
- Instance Structure: Controls the presentation of parameters in instances. By default, these parameters are arranged in a "Hierarchical" fashion that approximates the structure of the palette. "Flat" lists all parameters with no nesting at all, and "Grouped" presents a simpler arrangement, with just one level of nesting. "Flat" is recommended when using Slim with RenderMan for Maya.
- Expert Menus: Controls whether to display extra menus tailored for extension developers and experts.
- Network Layout: Controls where the "sinks" in your network will appear: "top" and "bottom" provide a vertical layout; "left" and "right" provide a horizontal layout.
- Connector Routing: controls the cosmetic appearance of the lines
representing connections between nodes:
- Normal - default behavior
- Sticks - straight lines
- Pipes - alternating straight/elbow sequences
- Noodles - double-curved lines
- Client Instances: controls the instancing behavior of the Attach and Add to Scene functions.
Preview
These settings allow you to configure the appearance of preview (or swatch) renders. These settings are spread across these sections:
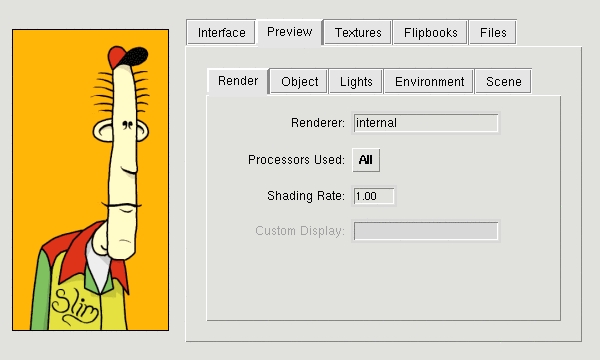
Render
- Renderer: To use Slim's internal prman renderer, set this to internal. To plug in your own renderer, place your rendering command here. You can use %f and %i, which will be replaced by the RIB filename and the Slim internal image name (respectively), e.g.:
prman %f
- Processors Used: Number of processors to use for preview renders. All instructs Slim to use all of your computer's processors.
- シェーディング Rate: Default シェーディング Rate for preview renders
- Custom Display: Use this option if you'd like to send the render to a display other than Slim. This option is disabled when using Slim's internal renderer.
Object
- Object Size: Default size of the object rendered in previews
- Object Shape: Default shape of the preview object
- Archive: Use this to select a custom RIB archive that will be used for the preview object. This option is disabled when using Slim's internal renderer.
ライト
- Simple ライト: This toggles the use of the three simple lights defined below.
- Key Light: The color and intensity of the key light for preview renderings. The key light is located behind, above, and to the right of the camera.
- Fill Light: The color and intensity of the fill light for preview renderings. The fill light is located behind, below, and to the left of the camera.
- Ambient Light: The color and intensity of the ambient light for preview renderings.
- Archive: Use this to define a custom RIB archive that will be used for lights. This option is disabled when using Slim's internal renderer.
Environment
- Environment Light: Toggles the use of an environment map-based light in preview renders. This environment performs an inexpensive approximation of diffuse and specular light for the purposes of previewing your shader.
- Environment Map: テクスチャ to use for the environment light in preview renders
- Kd: Strength of the diffuse component of the environment map
- Diffuse Blur: Amount to blur the environment map for diffuse approximation
- Ks: Strength of the specular component of the environment map
Scene
- Up Axis: sets the default Up Axis for preview renders
- Background テクスチャ: specifies a texture to use as a background plate in preview renders
- Surrounding Sphere: Toggles the presence of a sphere that surrounds the scene. This may be useful when ray-tracing.
- Sphere テクスチャ: テクスチャ map used on the surrounding sphere
- Show Frame Control: Show the Frame setting when displaying render settings. This can be useful when testing animated shaders.
テクスチャs
These settings apply to the rendering of textures only.
- Resolution: The resolution, in pixels, of the rendered image. テクスチャs are always rendered square.
- Renderer: The renderer to employ to render the textures. The line above causes Alfred to distribute the rendering to up to six processors. Slim substitutes %f with the name of a RIB file in the expression. Another common choice would be render %f.
Flipbooks
These settings apply to the rendering of flipbooks only.
- Resolution: The resolution of each frame in the flipbook, in pixels. Flipbook frames are always square.
- Frame Count: The number of frames in a flipbook.
- Sequence Begin: The first frame of your sequence.
- Sequence End: The last frame of your sequence.
- Renderer: The renderer to use for flipbook rendering. Choices are: internal, render, prman (external), and netrender.
Files
- Save Icons: selects which types of appearances should retain their icons when saved. Icons are useful for identifying shaders, but will make palette files larger.
- Saved Resolution: Resolution for saved icons. Saving at the lower resolution will keep palette files smaller.
- Full Paths: Controls whether to automatically truncate files selected via the file picker to relative pathnames. Truncation is performed according to policies set in the environment or via ini files. Please see the Asset Management documentation for complete details. Note that using full path names is discouraged.
- Master Directory: Controls whether the directory for an appearance's master is dereferenced upon creation. This can add stability at the cost of flexibility.
- Checkpoint Size: Sets a number of checkpoints for versioning any given palette. With the default setting of 0, no checkpoints will be kept. Higher settings will save a checkpointed versions of the palette to disk when a palette is saved, to the maximum setting provided by this preference. The palette checkpoints will conform to a numerated *.bk naming convention. Palettes may be reverted via Slim's Revert command.